Reblogging from last year because I miss this wall.
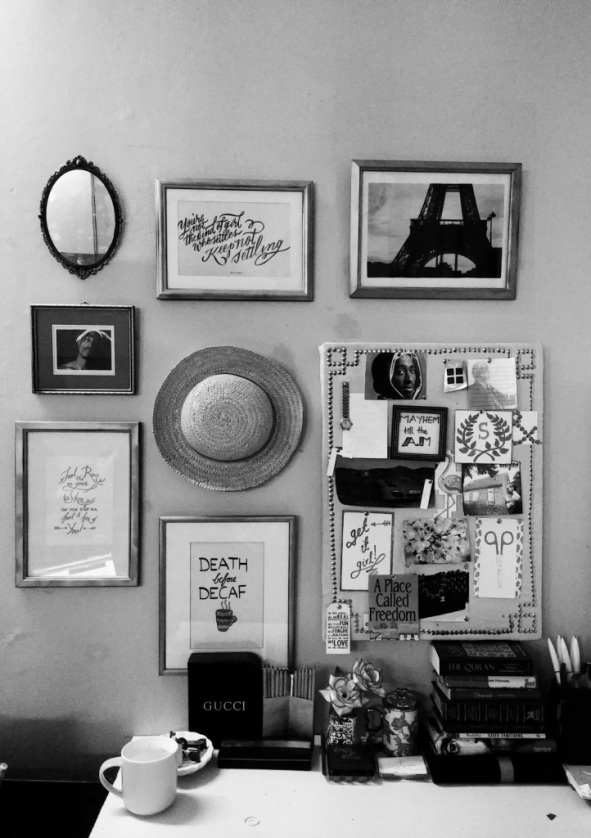
Today, I’m sharing with you a gallery wall that I put up in my dorm. Yes, I have a gallery wall in my dorm! The best thing about this place is that they let you paint the room and put up whatever you want on the walls. So unlike ‘wall-decals- are-your-best-friend’ sort of decor, we are talking about real designing here. Every year we are allotted a new dorm-room and we’d be moving very soon. My Pinterest boards are already drowning in ideas, but as excited as I’m about the starting the whole new decorating process, I’m also gonna miss this place. I started my blog in this dorm and my little study corner has also been my office.
Let me walk you through the process of building a gallery wall like this.
Frames
I got the frames from a thrift-shop and spray painted them in the same color. The colors can be different, but sticking to a theme creates a more cohesive look.
Selecting the art
The most important thing is to put up what you truly love. Those frames are staying right over there at least for a year or two after all the hard-work you’ve put into it. So don’t frame something that doesn’t inspire you just because you need to fill up the space. Carefully select pieces that reflect your taste. Mixing different media can make a fun collection. Add watercolor paintings, photographs and quotes. And if your looking for free printables, find them here and here.
Mixing elements
If you’re not a fan of eccentric or Bohemian gallery walls, skip this step and go for a clean grid with frames of the same shape. But if you want to jazz it up a bit, add different elements. DIY some art or revamp something you already own. I added the famous Straw Hat (One Piece fans would get it!) and a mirror along with the frames. I also put up the Inspiration Board because it was taking too much space on the studytable.
Laying it out
Put everything on the floor and figure out an arrangement. Adjust the spacing and keep moving the objects around till you get eye catching composition. Once you’re there, take a picture and use it as a reference for hanging.
Paper cut-outs
Trace the outlines of frames on a paper and cut them out. Use painter’s tape to stick these on the wall in the arrangement you decided upon. Although this step is totally optional and you can trust your gut feeling with the hanging process, chances are, you’d drill up a little too many holes readjusting the misaligned frames. So, this step gives a safety margin and you can visualize any mistakes in the composition before actually ruining the wall. Even though the frames would hide those extra holes, it’s never a bad idea to take a little precaution.
Hanging
With your composition already figured out and the reference cut-outs all set up , hanging won’t be half as difficult. So grab that hammer and give that bare wall a nice makeover!
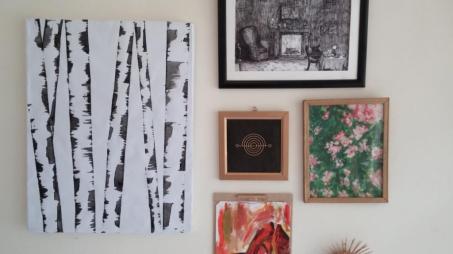
This is another gallery that I put together. Read more here.
Things to avoid
Do not go overboard. You might feel a full length gallery wall is going to be more fun, but in a small room it would actually look cluttered and untidy. Keep the dimensions of the place in your mind.
Do not mix so many different things that it’s difficult to understand what are you aiming for. Family photographs and memories? Great, but make sure your childhood stuffed toy doesn’t make it to the wall.
Most of the pieces should be at eye-level. Don’t hang them up too high or too low.
Not hanging the pieces properly might end up waking you up to the sound of your precious vintage mirror shattering. Invest in sturdy hangers!
And if you want more decor ideas, check out this post
Have fun decorating! Till next time!


Intersting your post. When i was reading it. I feel i am reading a manual guide. Great and good way to elaborate all things. Hope u can guide me to decorate my room. ?
LikeLiked by 2 people
Wow, that’s such a sweet compliment. I’m so happy the post is helpful. I do have a few more posts on the Decor page, maybe you’d find them useful for your room. 🙂
LikeLiked by 2 people
Thanks for ur reply. My pleasure. Can u help me if i share u pic for decore and color idea for room?
LikeLiked by 2 people
I would love to.
LikeLiked by 2 people
Sahar i will share u pics of my room. And would get advise from u. Agreed?
LikeLiked by 1 person
Sure. Send them to me through the ‘Contact’ page. 🙂
LikeLiked by 2 people
Reblogged this on KCJones.
LikeLiked by 2 people
Thanks!
LikeLiked by 2 people
Thank you for writing a great blog
LikeLike
These are good ideas in general!
LikeLiked by 2 people
Thank you 🙂
LikeLiked by 2 people
I would this keep in mind when decorating our wall! 😊
LikeLiked by 2 people
Awesome.
LikeLiked by 2 people
It’s amazing
LikeLiked by 3 people
Check out the Saulce blog! Thanks
LikeLike
amazing
LikeLike